From the GO Smart Panel Editor tab, you can create panels for a cycle any time after the cycle has been created. You can create multiple panels per cycle, each with custom instructions, settings, and multiple criteria that can be scored and commented on separately. Criteria titles and text can be customized and you can establish the maximum number of points that can be awarded per criteria. You can assign and unassign panelists as desired. Use the following table of contents to learn about each section of the Panel Editor tab.
Table of Contents
CONFIGURE PANEL
- Navigate to the Panel Editor tab.
- Select the Program and Cycle for which you would like to build your panel.
- Click the Create New Panel button.
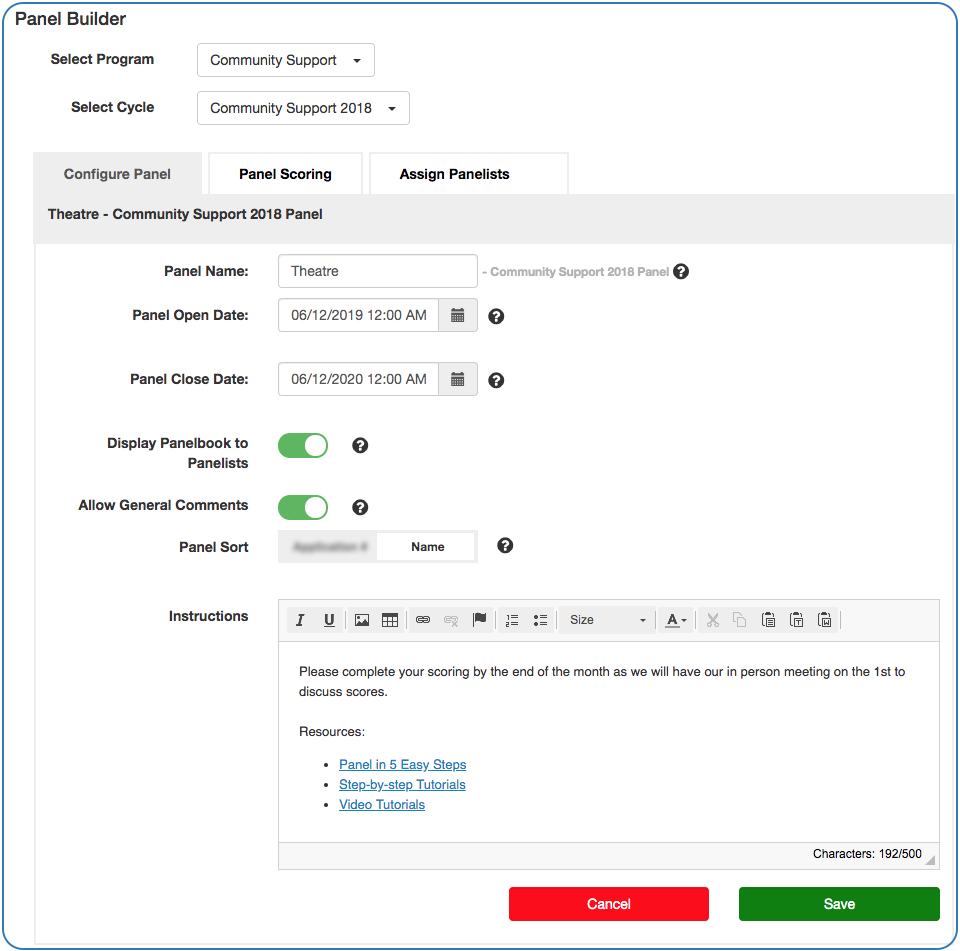
- Begin on the Configure Panel tab.
- Give the panel a name. We recommend typing only the discipline or category into the Panel Name field, or simply the word panel if you have only one per cycle, as the name you type will be automatically appended to the cycle name.
- Designate an On and Off date if you would like to hide the panel before or after certain dates. If you do nothing, by default the Open date will be the current date at 12:00 a.m. and the Close date and time will be 365 days later.
- Turn the Display Panel Book to Panelists option off or on.
- Turning this option on will place a Download Panel book button on your panelists’ dashboard that enables them to generate their own panel books.
- Turn off or on the optional “general comments” box for panelists that does not include an associated score or criteria.
- Set the default sort setting to Application # or Name.
- This setting determines the order of the panel book and the initial order of the assigned applications, though your panelists can reorder this list as they desire.
- Include general instructions for the panel. Link to external instructions if desired.
- Click Save.
Some notes on the Configure Panel tab:
- We recommend naming your panel something short and generic because the cycle name will automatically be appended to the panel name.
- Give your panelists the ability to generate their own panel books so that you don’t have to.
- Panel books created from the panelists’ dashboards will only contain the applications assigned to that panel.
- Panelists will be listed in the order you select from the Panel Sort field.
- Turning General Comments on includes a field on the Scorecard that allows panelists to provide general comments about the applications that will not impact the applicants’ scores.
- Instructions
PANEL SCORING – CREATE CRITERIA AND SCORING SCHEMA
- Go to the Panel Scoring tab to create new criteria or import existing criteria.
- To create new criteria:
- Give your first criterion a name.
- Enter your criterion description.
- Enter a maximum score for this criterion. This will appear to your panelists as a range from 0 to the entered maximum score.
- Click Add to include this criterion; you will see it appear below.
- If you want to delete the text you’ve added and start over, click Clear Form.
- To import criteria from existing panel:
- Click Import Criteria
- Select the Program, Cycle, and Panel from which you want to copy existing criteria
- See the copied criteria in the Saved Criteria section
- After adding all of your criteria, select and drag each criterion into the appropriate order.
- Click the blue Edit pencil icon to modify an existing criterion.
- Click the red Delete trash icon to remove an existing criterion.
- Click Save Criteria Order.
The image below shows the admin panel builder and where items appear on the panelist portal.
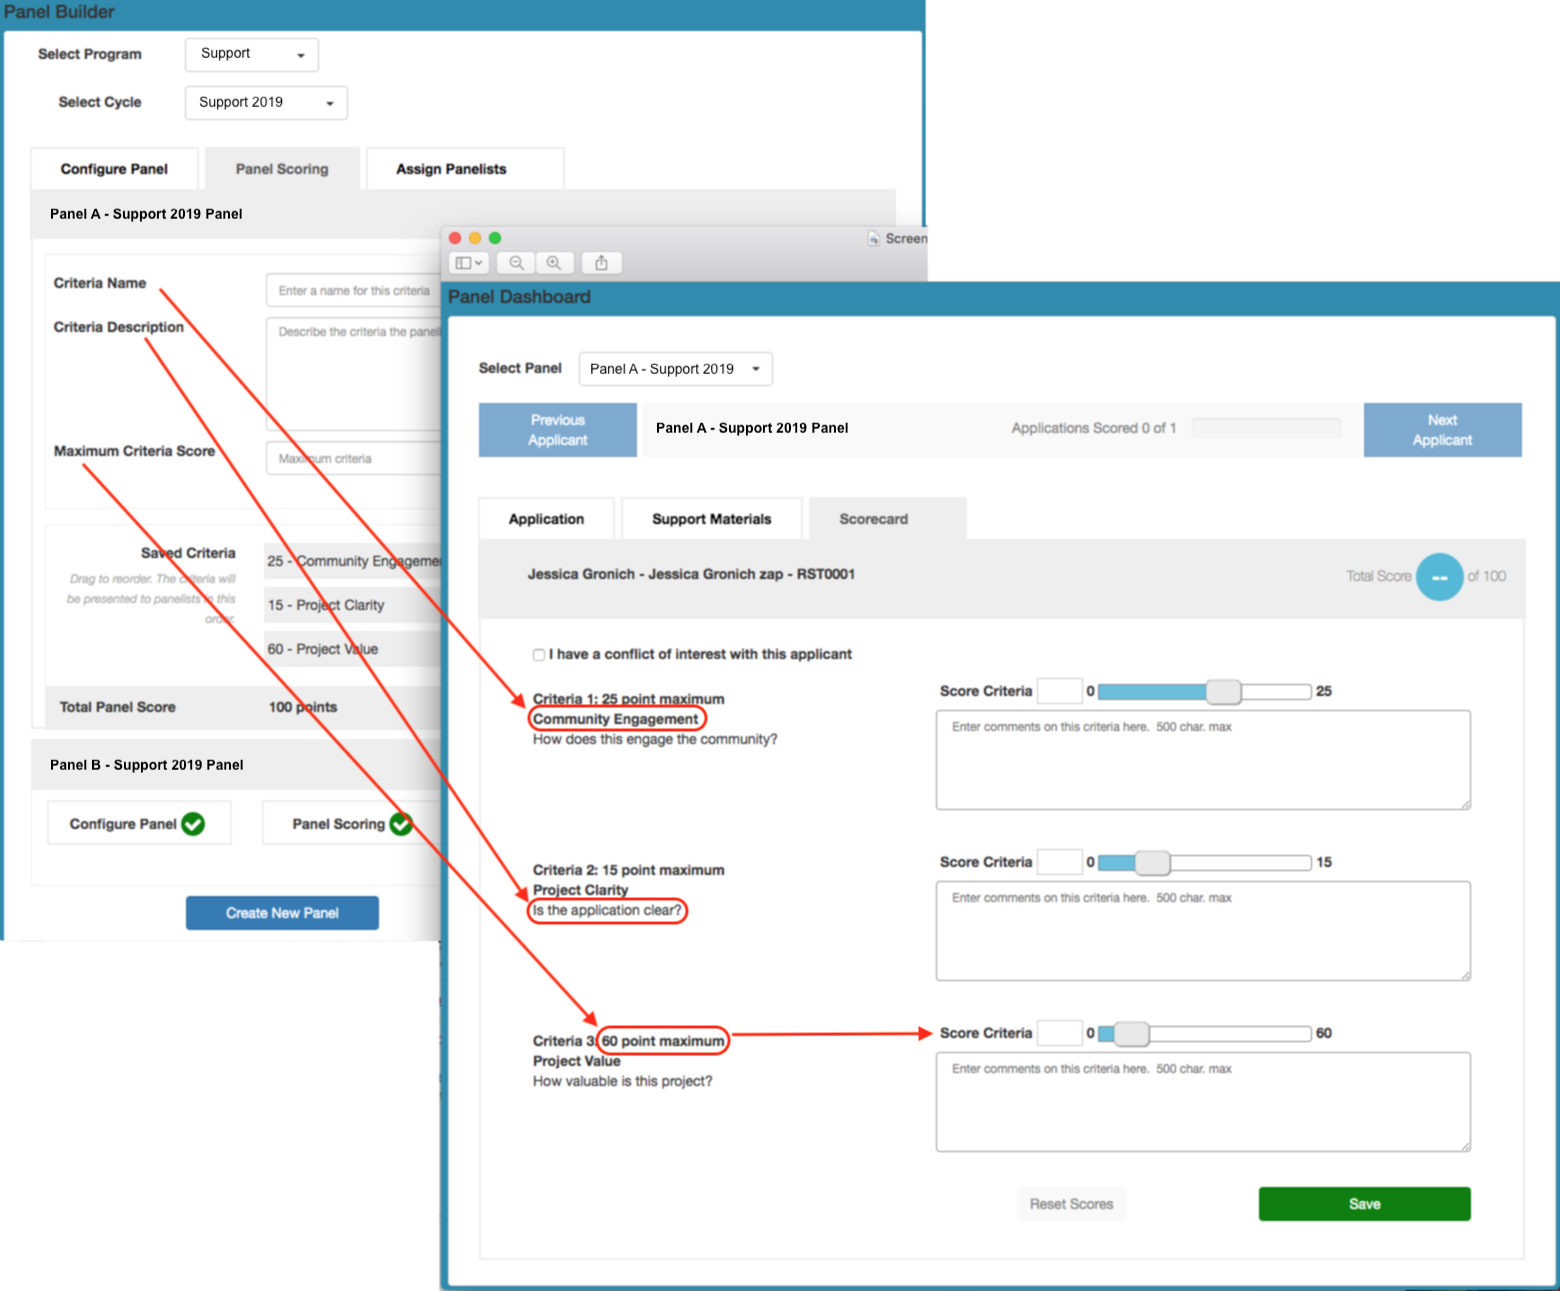
Some notes about the Panel Scoring tab:
- This section appears to Panelists as the Scorecard (see image above).
- There is no maximum of criteria per panel. However, we recommend including no more than 10 for ease of paneling.
- Criteria will be automatically numbered by the system.
- Don’t use numerals in your naming conventions, such as “Criteria 1.”
- Criteria Descriptions have a low character limit.
- Refrain from adding lengthy items here–the idea is to keep these descriptions short and sweet. If you have lengthy Criteria Descriptions, we recommend linking to a criteria list from the instructions field.
- The score range is from 0 to whatever number you enter into the Max Score field. The max score per criteria is 100. The max score per panel is 900.
- Edit, reorder, or delete Criteria.
- Existing criteria cannot be modified or removed once a panelist has scored them.
- However, additional criteria can be added after this point. Incomplete score labels will indicate to all panelists that there are new criteria to be scored.
- You can reset panelists scores from the panelist portal if you need to modify criteria
- Every criterion must be scored in order to display a score on the panelist dashboard.
- Use the General Comments box to collect unscored comments from your panelists rather than creating a zero-point criterion. Add your directions for your General Comments box to your General Instructions on the Configure Panel tab.
- If you do need to ask your panelists to answer pointed questions using a comment box without requesting a score, you can create a zero-point criteria by typing 0 into the Maximum Criteria Score field. If you do this, we recommend that you include directions that instruct panelists to type 0 into their score field for that/those scoreless criteria.
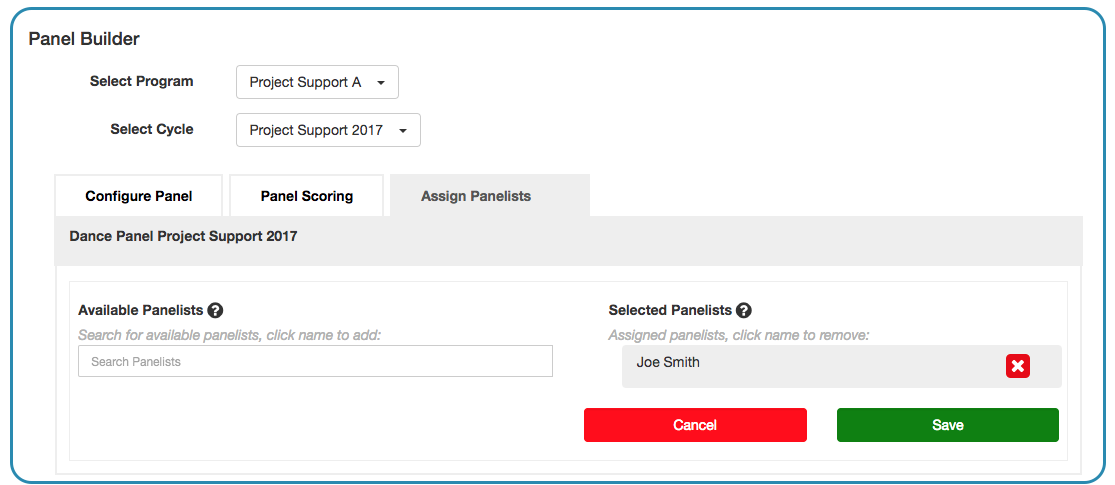
ASSIGN PANELISTS
- From the Assign Panelists tab, assign existing panelists.
- Begin to type a panelist’s name into the Available Panelist field.
- Select the desired panelist when their name appears.
- If you have not yet added your panelists to the User Editor, you can leave the panel builder, navigate to the User Editor, and create your panelists. Then you can return to the Panel Editor and click the Assign Panelist tab and select the desired panel.
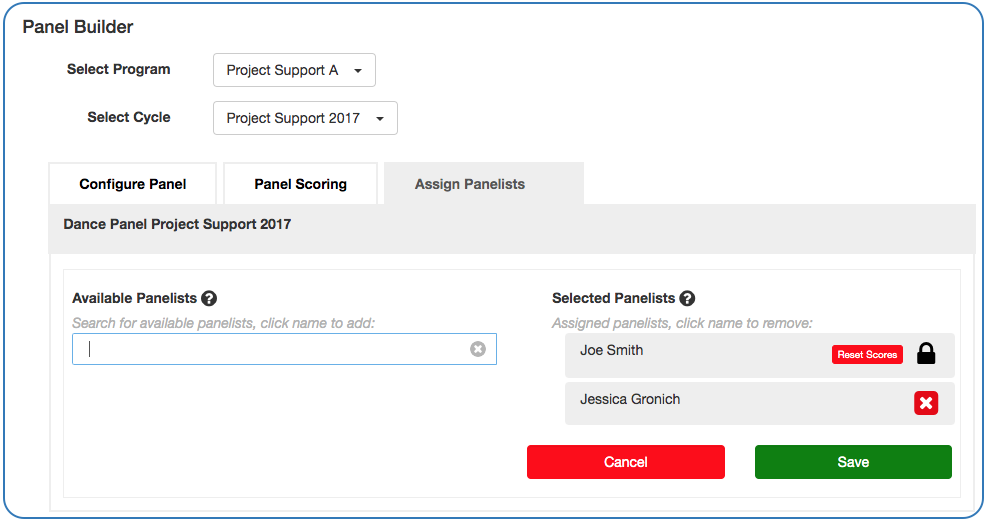
UNASSIGN PANELISTS
- Remove a selected panelist by clicking the red X to the right of the panelist’s name.
- If instead of a red X you see a lock icon and Reset Scores button, this panelist has already scored and/or commented and cannot be unassigned without first resetting scores.
- Click Save.
- When complete, the panel will display green check marks for all three tabs and will become available for assigning applications on the grant manager.
Click Reset Scores in order to permanently delete this panelist’s scores and comments for this panel. Resetting scores is necessary to unassign a panelist who has scored or commented on this panel.
Some notes about the Assign Panelist tab:
- You can safely leave this page to add Panelists on the User Editor if needed.
- When you return, you’ll see a yellow exclamation point indicating where you left off.
- You can assign the same panelist(s) to review multiple panels in a cycle.
- Each application can only be assigned to one panel at a time.
- If you include yourself as a test panelist, your test scores and comments will count against the actual averages.
- You can click the Reset Scores button for any panelist and this will
- delete all comments and scores for this panel
- allow this panelist to be unassign from this panel
- If you need to leave remarks or scores as an admin–but you don’t want to be included in the official panel–we recommend that you follow our recommendations for “panel rounds.” However, in this case we suggest that you create an “admin” round rather than a “Round 1.”
- You can click the Reset Scores button for any panelist and this will
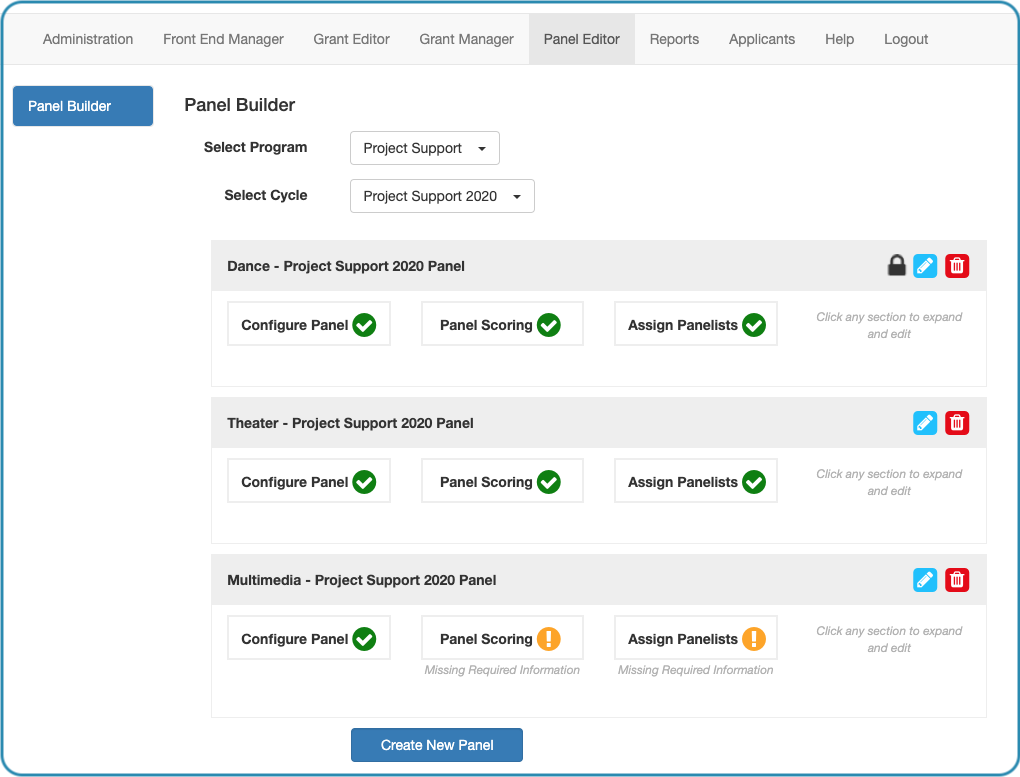
MODIFY, REMOVE, OR COMPLETE AN EXISTING PANEL
- Navigate to the Panel tab.
- Select the Program and Cycle for which you would like to build your panel.
- Click on any tab of any panel to modify that section.
- A yellow exclamation point icon will indicate any sections that need to be filled out before the panel is complete.
- Click the red trash icon along the gray bar of any panel to permanently delete that panel.
Some notes about the Panels tab:
- A black lock icon in the gray panel name bar indicates that panelists have accessed and scored for this panel, which means that the panel cannot be removed. Criteria can be added to a locked panel, but existing criteria cannot be removed or modified.
- You can navigate to the Assign Panelists tab and reset all panelists who have scored or commented to unlock a panel.
After you have completed building your panels, be sure to navigate to the Grant Manager dashboard and assign your applicants to the appropriate panel. Panelists will not be able to see the panel(s) to which they’re assigned until there’s at least one assigned application.
2 Responses