An Intent to Apply page is used most frequently to give grant admin the opportunity to review pre-application data and determine if an applicant should move forward. An Intent to Apply can also be used to gather information that should not be visible to a panelist. You can only include one Intent to Apply page per cycle and all the elements of your Intent to Apply will make up that single page. The system will treat the Intent to Apply as an independent form and will be the first page available to applicants.
If you don’t see the option to add an Intent to Apply page in the Page Type dropdown at Grant Editor > Cycle Pages, your site may have that feature turned off. If you would like to offer Intents to Apply and cannot, please reach out to the GO Smart team.
With an Intent to Apply, you can:
- Add custom questions in a way that suits your needs.
- Create settings that determine whether or not you have to manually approve the Intent to Apply or if applicants can access the application immediately after submitting the Intent to Apply.
- Determine if the form becomes part of the application either on the applicant’s screen or in the read-only form that is viewed by panelists.
Table of Contents
Add an Intent to Apply Page to Your Cycle
Settings of the Intent to Apply
Add Questions to the Intent to Apply
Effects to Statuses When Intents to Apply are Included in the Cycle
Applicant view of an Intent to Apply page
Add an Intent to Apply page to your cycle
- Log in at admin.gosmart.org with your admin credentials
- Navigate to Front End Manager > Application Pages
- Select the Program and Cycle you are working on
- Scroll toward the bottom of the page to the “Add New Page” section
- Select Intent to Apply from the Type drop down
- Type a title for the page as you would like it to appear to your applicant in their table of contents and at the top of their Intent to Apply page (see above image)
- Click Add
- Click Edit to the right of the purple Intent to Apply page that now appears in the table displaying your pages
- Add your custom directive language in the Info/Instruction text field
- Create the settings of your Intent to Apply page/pageset
- Add questions that will help you and/or your applicants determine their eligibility
- Navigate to the Grant Editor > Program Cycles > Applicant Access & Dates tab and select Yes for Offer Intent to Apply
- Set an appropriate deadline for the Intent to Apply; this can sometimes be the same as the Application Deadline or it may make sense to make it sooner than the Application Deadline to give you and applicants time to review and work on the application.
Admin view of the Cycle Pages subtab.
On the Intent to Apply page, you will first see an area to add custom Info/Instructional language for your applicants when they arrive in the Intent to Apply.
Settings of the Intent to Apply
The Rules section allows you to determine how you want your Intent to Apply to behave.
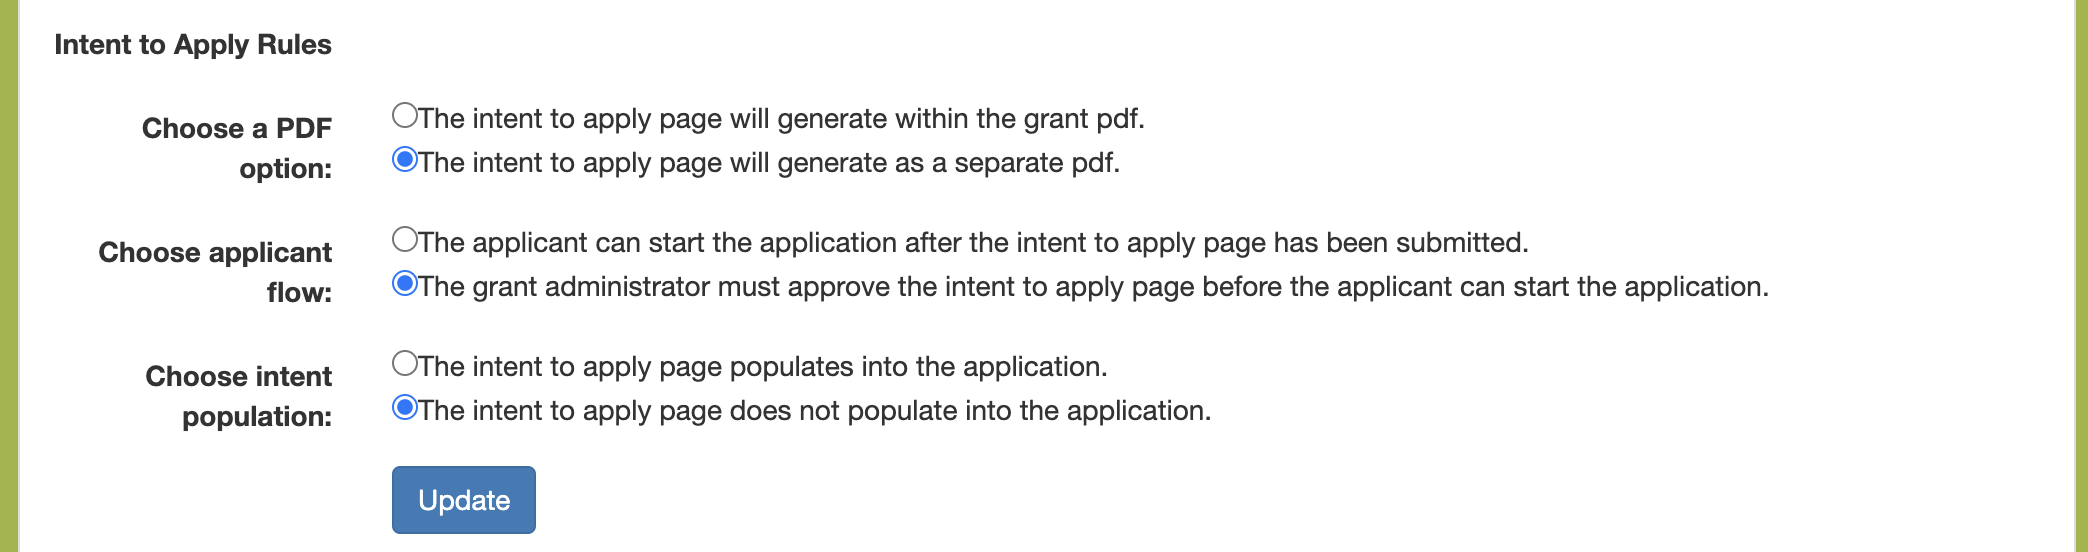
Choose a PDF option: This setting will determine if your Intent to Apply read-only form is part of your Application read-only form. Selecting the first radio button will allow you and your panelists to see the Intent to Apply content along with the Application content in a single read-only form. If you select this option, you will only see the Application link option from your Grant Manager dashboard and will need to click that to see the Intent responses. Your applicants will continue to see their Intent content in a separate read-only form from their application content. We do not recommend this setting without first speaking to a GO Smart team member. We recommend the second radio button for this setting.
Choose applicant workflow: This setting determines if applicants can begin working on the application before you manually approve the intent to apply. If you want to vet their intent to apply before they can apply, select the second option. We recommend the second radio button if you would like to determine who moves from the Intent to Apply to the Application.
Choose intent population: This setting places the Intent to Apply read-write content into the applicant’s read-write Application form. This setting won’t display the Intent content to the admin or panelists while reviewing the Application read-only form. Selecting the first setting allows your applicants the ability to view and modify their questions and responses while in the Application. We do not recommend this setting without first speaking to a GO Smart team member. We recommend the second radio button for this setting.
Changing any of these settings mid-cycle will not affect your applicant’s current responses, however we always recommend that you have these types of settings finalized before opening your cycle to applicants.
Add Questions to the Intent to Apply
Add your desired questions to this page. Scroll to the bottom of the Intent to Apply page and select the type of question(s) you want to include. Click Edit to the right of the questions after they populate the Question table. Learn about creating and editing questions here. Note that you can add all question types to an Intent to Apply EXCEPT for a Category Sort Select question.
Effects to Statuses When Intents to Apply are Included in the Cycle
Introducing an Intent to Apply changes the way you use your statuses. It is vital that the system be told that an applicant is following the appropriate workflow and this can sometimes mean that you need to change an applicant’s cycle status in ways that feel redundant or not intuitive.
One Response